|
|
|
1) Something
Old |
|
During
the assembly of the custom MIDI pedalboard, I began to seek
out some other samples and sounds of real pipe organs. It's
much easier to produce the sounds of electronic organs,
after all. The K2600 happens to do a remarkable emulation of
that, for example. But the range of sounds is considerably
more limited in the Hammond, Conn, Baldwin, and other early
electronic instruments than in "the real thing." If cost and
space played no role, it's likely that the earlier
electronic organs would never have replaced so many pipe
organs. I wanted to find both some good classical organ and
theater organ ranks, as they're quite different. The former
was more easily found. I discovered a few websites that
distribute a fine collection which a small group of
enterprising fans led by Micheil Post in Amsterdam have
assembled, the Post Organ Toolkit
(since
the url has changed, just do a Google search on that name
string, if you wish more info, or
try this link, which was working
recently).
These are excellent, cleanly produced pipe rank sounds, from
several lovely European instruments. At this time I discovered
how to convert some of these "straight-organ" sounds into
more orchestral organ versions. I'm fond of both kinds of
organ styles and timbres, the starker classic and more
orchestral cinema. Since real orchestras use a tasteful
amount of vibrato on nearly all instruments (not clarinet or
percs or harp, of course...), that has to be added. Real
pipe organs use a tremulant box on the wind supplies to each
chest to accomplish this. With properly voiced pipes not
only will the amplitude vary with the swing of pressure, but
the spectrum and more important, the pitch will, too. It's a
complex interaction, which Kurzweil's VAST synth tools is
well adaptable to handling. As long as the variations are
linear, within certain bounds, you can come up with a pretty
impressive trem version of many of the ranks in the Post
Toolkit. But still these are not the same as what the big
old cinema organs could do at the drop of a stop tab.
Sometimes the organists even forgot to turn the trems off
now and then -- for variety's sake! But like it or leave it
alone, as with the big rotating speakers Don Leslie came up
with for the formerly dullish Hammond organ sound, this mild
undulation is an idiosyncratic part of the timbre of an
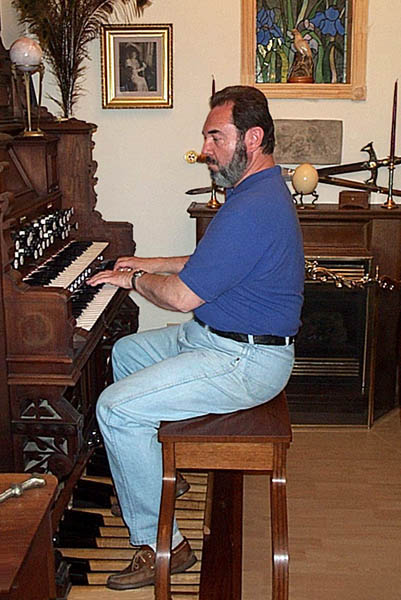
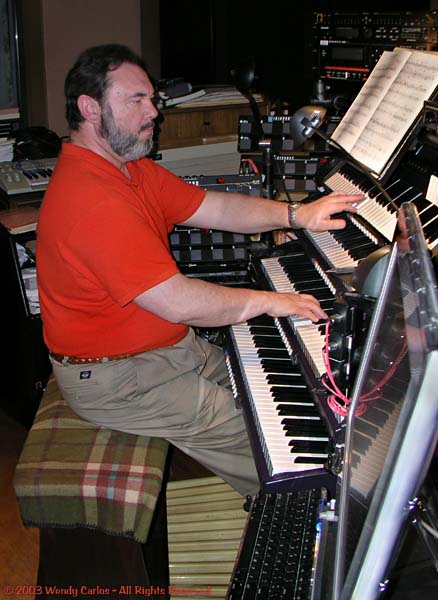
orchestral style pipe organ. If I were an organist, and not so interested in sound design and creating my own tools and timbre paradigms, I'd have adopted this clever, modestly priced device right off (Clark's company, Allen, makes an even smaller MIDI pipe rank box, BTW). I'd recommend it to any of you with that focus. But now that I had my first K2600, and was spending long days and nights on it getting my chops and sound design skills back, I was not about to abandon those to a more conventional approach (see, I told you I'm crazy). It was a little bit like history repeating itself again, as I missed out once more on becoming an Artisan organ owner (I'm sorry, Red), but instead took a small step sideways. Long story short, Red introduced me to Artisan co-owner, Mark Andersen. He's also the brains behind their marvelous collection of actual pipe organ ranks, and has built some gorgeous instruments in his upstate NY home. Too bad he no longer lives in NYC, or he'd have to shoo me away from his front door! But we used the phone and e-mail often, and have now become friends. He turned out also to be a longtime fan of mine. And when he learned what I was concocting here, he also offered to help. We traded CD's, as I also did with Red, and got to hear their effective demonstration of all kinds of organ sound they have made available. And before I could add anything further, I ended up with a collection of Mark's wunnerful WurliTzer and other TO samples. It's a meticulous set, years of care and experience in the making, and provided exactly the missing ingredient that this slowly growing new instrument needed. To the left below is a recent photo of Mark performing on one of his restored antique instruments. The next photo is even more recent, and shows Mark in my studio (during our first f2f visit, in fact!) trying out the Wurly II, which you're going to watch grow from the ground up next. Mark's rather similar to
me, similar to a lot of us in the synth world, a fully
hybrid person, combining both tech and artistic skills and
interests. He's also a formidable performer, an inspiration
to an "adult beginner" like I've become (at least in this
part of music making). It turns out that Mark is about as
obsessive as I am about musical sounds. The TLC shows up all
the time in working with the full collection. Like most
creative enterprises, it's nowhere near as easy as it
appears from without. Mark also is a formidable C++ computer
programmer. While I'm using the new instrument for other
purposes than just emulating pipe organs of sundry kinds, I
will admit getting a HUGE kick out of being able to produce
myself some of the sounds which I heard during my
adolescence, and which inspired my career. |
|
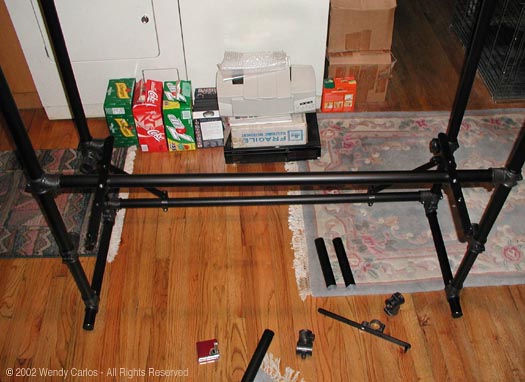
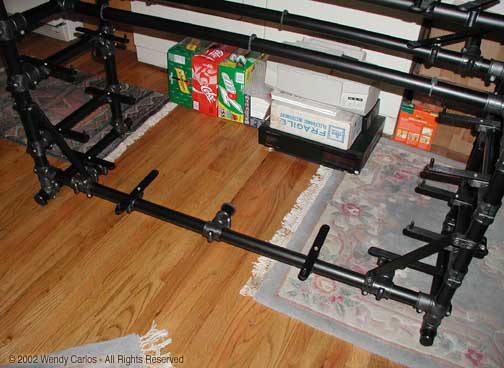
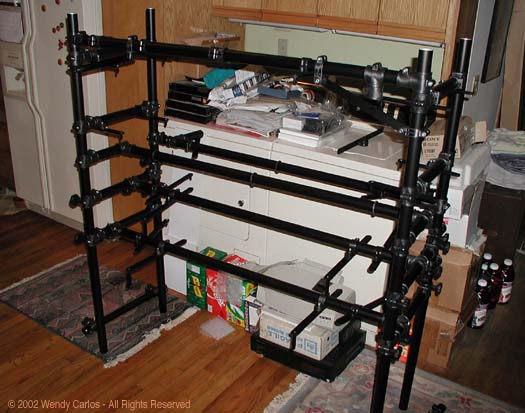
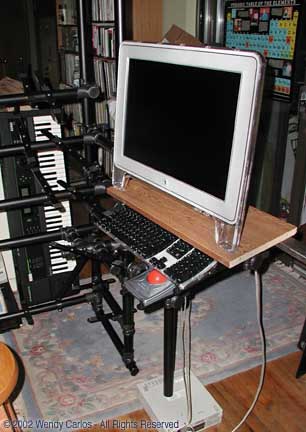
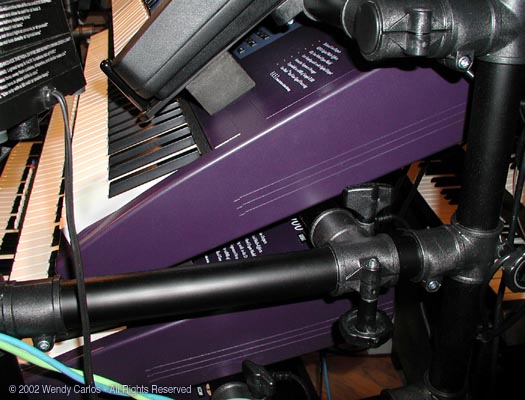
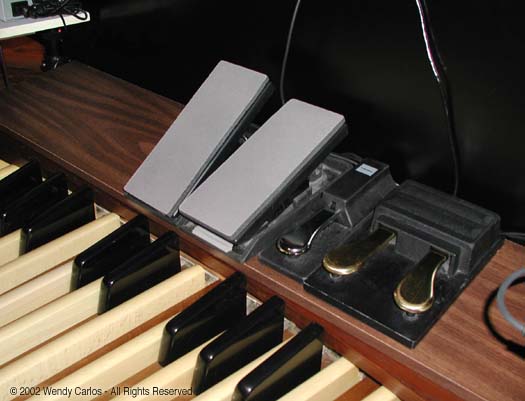
Fine, here's a functioning new instrument, with a working MIDI Pedalboard, the start of a full library of pipe sounds, to add to all the other acoustic instruments and exotic digital synth creations. Time to put it together into something a little more playable and lasting than piles of stuff precariously stacked in a corner. When the studio finally became organized, it was largely as I became adept at noodling together components from Ultimate Support Systems. Once you get the hang of it, know what bits to order for what purpose, it's a great way to cobble something together that is sturdy and flexible. Since the section of my studio where this was heading is far too small for a work space, I took over the kitchen / dining area. For nearly two months this is what it looked like, furniture and messy boxes and parts moved around to make room for tinker toying with the Thinker Toy handy dandy construction set (parental guidance suggested...)! Here we go then, collapsing the weeks into one web page. First I opened up the uncut tubing box, took out several five foot lengths. With some of the most useful component, the T-Fittings, and two leg kits these were roughed out into a promising simple right angle assembly, seen left above. There are two angled braces, as I worried that such a lot of eventual weight might be slightly wobbly. This is what sat here at the end of the first session. A few feet away I put together the parts for the first tier, mounting the brackets on a horizontal, which went directly on two more uprights. These would become the front corners of the rig. The third view shows that section mounted into the Step One parts, everything fastened together tightly. It was very solid and promising. Now it was a straightforward matter to prefab the second tier, the first of the tiers which could pivot on a horizontal axis. That was an idea I'd sketched out in pencil first -- a way to move upper units up and away so one could reach and work on the front panel controls of lower units. When you were done with editing and creating new sounds, you'd just swing everything back down again to perform -- at least that was the idea. Since the assembly was growing rather bulky at this stage, I was grateful for the help of musician Clare Cooper, who spent many hours assisting me in the next stage of assembly. You may recall that Clare had been part of the "Bach at the Beacon" concert several years ago, and also worked with me on the "Woundings" filmscore the following year. Need not say we've become close friends. It made this part of the job more fun to work together. We'd place a couple of 2600's in temporary position, try it out for size and spacing, note the problems, then take them off again for "creative modifications." There would have to be some kind of lower rear shelf to support the expression pedals, to protect the open rear of the pedalboard, perhaps serve other eventual functions, too. So step two, seen here from the rear (the stand has been rotated around 180 degrees for this stage), took this form. While I was working at that addition I found it hard to assemble parts down at floor level. No problem, I hoisted the whole thing, which was still pretty light for its size and strength, into an upside down position, as you see to the right above. Much better. Other questions came up. So
where could the hard drives mount? How about on two small
shelves below and to each side? Fine. And let's get a third
tier up there. Here's a side view, back in non-inverted
position, as the support stand was definitely taking shape.
At about this time I had the brainstorm: "No, don't build
another separate stand for the computer -- put it all
together as a part of the main stand!" Um, right, uh --
would that work? I spent a day trying variations of the
idea. Eventually, as you can see in the center above, I'd
ended up with this ugly prototype, a swinging shelf which
could handily support the flat panel monitor and both
keyboard and trackball (for large monitors a mouse is
clumsy, imho, and a trackball, once you learn how to use it,
is a much faster pointing tool). |
|
Moving right along, it was time to check out the mounting of the synths. My singularly generous, super bright friends, John and Mike, are long-time supporters of the arts, and in particular often help artists they know who use computers. Over several years they've provided me with the Mac equipment I've been using for new music and the ongoing remastering of CD's for ESD. Has taken me some effort to allow their thoughtful assistance -- my Yankee upbringing doesn't accept favors or gifts (nor praise) easily. Last summer they heard about and offered to help on this new project, if I wouldn't mind (see what I mean? Singular). They decided to set me up not with another general purpose computer, but with two more K2600 music computers. Since these were becoming quite scarce (discontinued by Kurzweil?), and since the K3000 appears to have been dropped from the company plans (nutz), I'd have had to find a way to get a second unit, if for no more than BU during deadlines. Then I could use the old SY77 as a third keyboard controller, along with the existing K2000s. But John and Mike changed
that idea. Instead I was now surprised to have three
K2600S's with which to build Wurly II. Wow! This model has
the 76-note keyboards which feel so good to play. The
88-note piano keys of a 2600X would have been lovely, too.
But that model is much larger and very much heavier than
this one. Don't have the space, nor the muscles for it.
Let's see, the original 61-note K2000S could sit up at the
top, where the Solo manual of an organ would be located. To
the left above you can see how the upper three synths are
mounted with the black support tubing just below the center
of mass. You have to angle each of the support bars slightly
to achieve that positioning. So each synth is bistable, and
will gladly sit either all the way forward, or similarly
backwards, with little friction needed to hold it in either
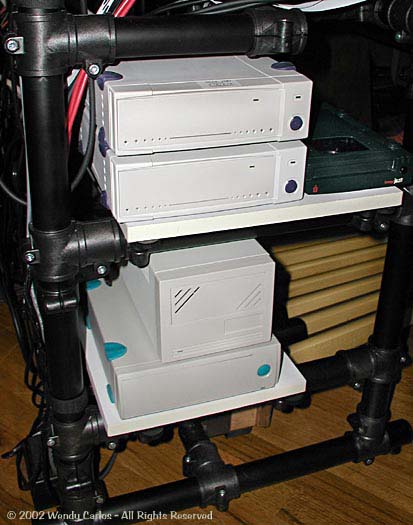
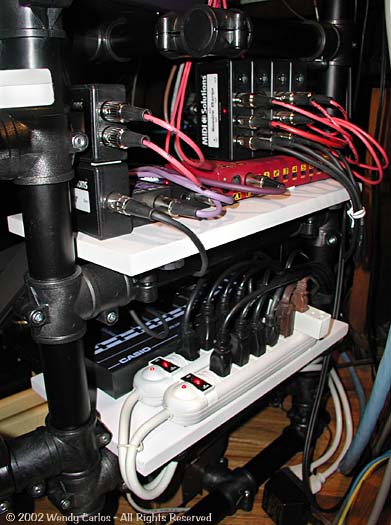
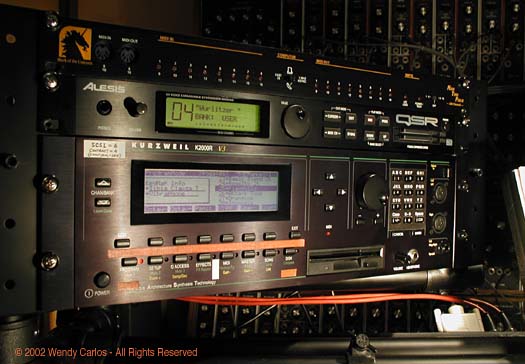
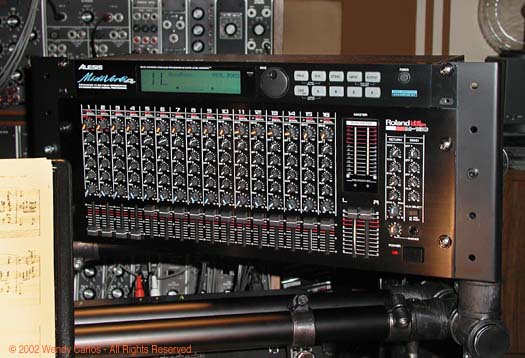
place. Those two pairs of side shelves also came out rather well. I used more of the same plastic laminate shelf material from the high priced but convenient neighborhood lumber store, just as I'd done a dozen years ago for the computer table you can see in some of the first photos way above, and other places in our website. The side shelves worked out just as stylishly. The left pair support four of the several SCSI Hard drives (and a small removable BU drive) that store all the files for the synths (there's a fifth HD not visible here). The right shelves handle both the power strips and most of the MIDI boxes which were needed to obtain some of the interconnection functions between synths, simply and easily. Yes, there are wires all around, mostly cabled, and far from messy, so it's actually quite easy to trace down problems, or make modifications at any time. Having an up-to-date schematic diagram is another big help. I'll add the latest diagram FYI later on. There was some grief trying
to dope out where to mount the rack units. First came the
rack K2000R, now configured as a "slave" to the keyboard
K2000S -- the pair effectively acts like a fourth 2600 (same
polyphony, anyway). Some other rack mount essentials are: a
simple mixer, reverb, a MotU MidiTimepiece that would tie
the new G4 to the rig, and so on. Here you can see that the
final solution was to mount all of these up at the top, at a
modest angle to the front. It's convenient, and doesn't look
bad. While these are supported on the tall rear vertical
tubes, the front uprights were just getting in the way. So I
measured and cut them down. At the top of each sits a mount
for one of the two bright halogen lights that illuminate the
music rack. Actually that's an Ultimate Support sturdy
plastic shelf, but the size was right, and with some foam
rubber edging inside the lip, it makes a comfortable music
rack. It's pivoted, too, like the synths beneath it. You'll
see how they tilt in the next section.
|
|
|
Wendy Carlos, Wurly II -
2
![]()